Tuesday, April 1, 2014

An update on the Victory garden

This is a quick update on how I have been getting on with the Victory garden.

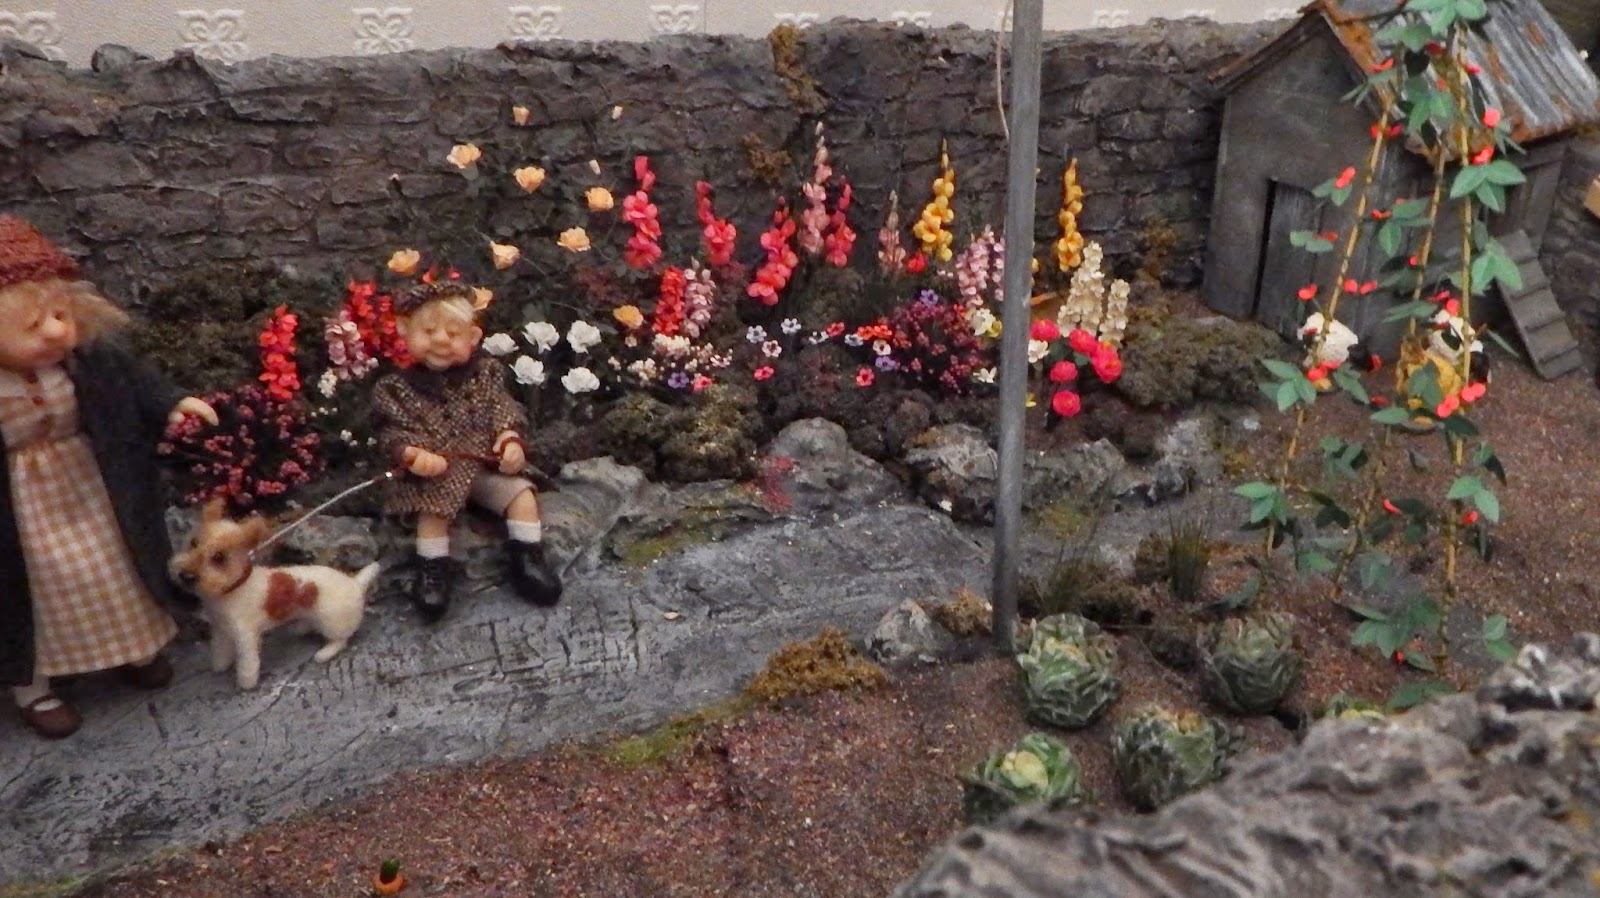
I have been making a lot of flowers from kits from the miniature garden and also from online tutorials for the smaller section of the garden . The larger section of garden will be for the vegetables.
I have already started planting some of them.


I made the cabbages from polymer clay, and the runner beans are from a kit from the the miniature garden

Here is another view

 
I still need to fence the chickens in and give them something to peck at.
hmmm... the bamboo on the beans looks a bit bent in this picture I will have to see to that and make it straight again. 
 
I just love my little evacuee with the dog. My little girl evacuee is very sad but I think the little dog will cheer her up.

Thursday, February 27, 2014

The evacuees and residents of my 40's house

Here are the evacuees in part of the Victory garden.
The dolls have all been made by the very talented Joy Cox of Adora-bella-minis. she also made the adorable little dog who is being held by my smallest little boy.
I have always loved Joys dolls as they have such different expressions and they make me smile.
All the residents of my 40s house are by Joy.

 
Joy dressed all the children apart from the little boy on the go-cart who I dressed.
 
Here is another picture of the go-cart which  is absolutely brilliant. It even has a brake!
It was made by the very talented Roberson miniatures
who also make terrific prams too. 


Here is part of the shop with the shopkeeper, the evacuation officer and two of the evacuees 


I just love this little old lady and as soon as I saw her I just knew she had to be the evacuation officer
Look at her lovely brooch on her coat. I remember my aunt always wore a brooch on her coat.
 
 
 Here is the home guard (dressed by me)  and air raid warden. I love his face he looks full of fun.


Christmas in the 40's house (The old man was dressed by me)
The chairs were made following a tutorial from1inchminisbykris. There are some super tutorials on her blog


Baking day in the Kitchen
This little old lady was dressed by me.
The cooker and water heater  are made from phoenix miniatures kits. The kitchen food cabinet and kitchen table and accessories and the wash board were made from kits by Jane Harrop 


The chicken coop

Today I finished making the chicken coop.
I had found the instructions for it from an old dolls house and miniature scene magazine that I had. But I made a few changes to mine as I wanted my coup to look old and a bit shabby.

Here it is made up in wood and painted with a dirty wash of brown acrylic paint
 
I did a little more painting to make the wood  look aged and weathered .
I used a dry brush and some white and green acrylic paint
 
I wanted my chicken coop to have an old corrugated tin sheet roof so I painted some corrugated cardboard in different shades of grey acrylic paint roughed up the edges a bit and glued the pieces to the wooden roof. I then added a ridge also made from cardboard which had been painted in the same colours and then painted several areas with scenic rust.
 
Here it is finished


Just some more planting and landscaping around it and then this little area of the garden will be finished.
 

Tuesday, February 25, 2014

Dig for victory

I have started a victory garden for my 1940s village stores. I have so many ideas for it, I just hope that I can fit everything in that I want to make for it.

The garden is in two pieces which fit together as I didn't think the original one piece would be big enough. It will also be easier to move around with it being in two smaller pieces and I am hoping that with some careful planting the join wont be seen.

I started with a board for each piece onto which I glued sides made out of foam core board. I then glued pieces of polystyrene onto the base and card to represent the walls and soil. This was then covered with a coat of household filler, I then added another coat of filler over a stencil to make the stone effect.

This is one of the pieces I know it looks a bit messy now but it does get better I promise.

Once the filler was dry I started to paint it and age it with different colours of paint.You can see the join of the two pieces in this picture which will hopefully be hidden by some careful planting.
 
In this picture you can see my two posts which will be for the washing line. The right hand side of the garden will be where all the vegetables will be planted.


Next came the fun part starting the planting.
 
This is the rockery area and as you can see the join between the two sections of garden has been hidden by the planting.


The next job will be making all the vegetables to plant.
Then I need to make a chicken coup, the gate and of course the shed to keep all the gardening tools.


*********


Monday, August 19, 2013


It has been ages since my last blog. I can't believe that this is my first this year.  I always seem to be apologising for not keeping up.
 
However I have made a new little cat that I have displayed in my wind in the willows scene . She is the first dressed cat that I have made and was great fun to do. I would never have made her if it wasn’t for Sandie choosing an animal or something to do with animals for the project of the month in the yahoo group that I am a member of. So thank you Sandie you have started me with the little animal bug again.


Still continuing with the animal theme. This was the summer swap that I made my friend  May, who  has a super mouse house.  The swap  was themed and was to be either something for a summer picnic or a Barbecue.
 I wanted it to be a  little surprise really , so that when she would open the parcel she would think that she was having a picnic hamper but.........
 

  inside as you can see was a tiny mouse  with his backpack for his food for a picnic. I also decided as it was summer to give him an ice cream to eat.


Here  he is in my wind in the willows scene with the cat.


May has given him a name and it is Hobo. I think it really suits him.


Here is the super swap that I received from May.
 When I opened up my parcel I was totally amazed. It was a real wow! moment. May had sent me a  wonderful barbecue which is going to take pride of place in my garden. It is absolutely brilliant.  It has so many different kinds of food , the more you look at it the more you see . It even has ketchup and a bottle of cola.  There is everything that you could need for a very special barbecue party. Thank you so much May.


Tuesday, October 9, 2012

The voting is over

Well  the voting is over in the competition that took place in the yahoo group which i am a member of and i am totally thrilled as one of my entries won first place.

So now after all this time of secrets i can reveal what i have been making  and

this is my winning entry which i named 'The Autumn harvest'.

 
Everything has been made by me apart from the garden fork, the pink wellies and the house name.
 
The leaves and flowers for the pumpkins were a kit from The miniature garden. All the vegetables have been made from polymer clay and the tiny little blackberries on the bramble bush and in the basket have been made from hundreds of tiny little black no hole ( micro) beads and some have been individually painted to represent some berries which are not quite ripe yet.


 Here is a closer picture so that you can see some of the little berries.

 
Another picture showing the view over the garden wall. Hmm.. can just see me living there. I love the countryside.


Here is my second entry

 
This is the Willow bakery.
I must say that i didn't enjoy making this one as much as the harvest. This was the first entry i made and i wasn't very happy with it as it wasn't realistic enough.. It didn't have the aged and worn look that i just love so much.
 
 
I did manage to get one aged little item in as you can see , The green stool ! Everything was made by me apart from the shop till, the small basket that holds the bread rolls on the left of the counter and the glass stand with the macaroons. I must say i enjoyed making all the different bread but the cakes were a bit of a chore. I made and printed all the little price labels , the pictures and price lists were printies and pictures i found on the Internet and in miniature magazines. 
 
 
Here you can see all the little cakes and bread that i made.


Here is a picture of the front of the little shop box that is home to the bakery.
I decided to paint it in pastel shades with a bit of a shabby chic look. However As you can see i have distressed the front, maybe the inside will have the same treatment before long.
I still have to decide on a display for the window as at the moment There are only four little cakes in there. Not much to tempt a shopper in to buy.


.
.


Tuesday, September 4, 2012

Hello again everyone. At the moment i am finishing off a competition piece that  i am making for the miniature yahoo group that i am on. So i am afraid i cant show you anything yet as it is a big secret at the moment.

I have started making my Christmas cards for this year . I just love stamping images and colouring them up to make my toppers. This year i have bought new stamps from Lili of the valley and also Nellie Snellen. I cant wait to start using my new die cutters too. I have bought some of the brilliant Tim Holtz ones this year so i am really looking forward to using them.

 I have also started doing crochet again . I am planning to make a throw from granny squares and hope to do at least one square a day. Its going to take me a long time Lol.


Thursday, August 16, 2012

Back again

Hmm .... I know i have neglected my blog for some time. Been doing other things i am afraid. My real life house has been decorated. I just love wallpapering, but not so keen on glossing the woodwork .

However in between the decorating I have also been making some more minis for the online yahoo group that i am a member of which is called Miniature Haven . Every month we have a project of the month to make. Last months project was something for the Nursery so I sculpted  a little toddler from polymer clay. I also made her  a super toy from a kit by Jane Harrop  which i received in a birthday swap last year from a friend on the group.

Here is a picture of her for you to see with her toy.


The month before the project for the month was something for the kitchen  so i made a cake decorating table. I loved making this and I learned so much as i had never made anything like it before. It was so much fun.


I love pastel shades and have decided that i am going to re-decorate my Georgian house and make it all shabby chic with  pastel coloured furniture and accessories. That is another job on my to-do list which funnily enough seems to get bigger and bigger all the time.I dont know when i am going to get all the jobs done Lol!.


Wednesday, April 18, 2012

Outfits for the Edwardian shop

Well i have been having a great time making up some outfits for the Edwardian shop. The first i made was a wedding dress which was a workshop from  Hazel Dowd. I love making up kits by Hazel as the instructions are so easy to follow and you always get such beautiful realistic results. Her tips for draping have to be the best.


Here is the wedding dress


I also made an outfit form the May issue of the  dolls house and miniature scene magazine.  It looked a bit difficult to do and i wanted mine on a mannequin and not on a doll so I had to make a few alterations but i think it turned out ok.
 Here is a picture of it. Sorry  the picture is not straight. I will have to remember to take a better one when i am taking photographs again.


Thursday, April 12, 2012

A new project.

Over the Easter holidays I have been busy starting another project.  This time in 12th scale .It is to be an Edwardian clothes shop and haberdashery.

Several years ago my hubby bought me a Sid Cooke shop from a seller on  ebay. The shop kit  had already been made up and was used as a sweet shop. It looked super with all its little glass jars of sweets and chocolates, but the person who owned it only wanted to sell the shop.


It has sat here on the shelf looking sad and neglected and desperately in need of a face lift. So the work started.

Some bricks had been added to one side of the shop which had to be removed, I wet them slightly and let them soak for a little while and they were able to be removed with the help of a a paint scraper.


 I  removed the shop front  and i removed all the glass. It was easier to paint this way.

I repainted the inside in a lovely Laura Ashley emulsion paint in a pale blue colour, and painted the shop front in a cream and beige  to brighten it up. The front paved area had been covered with tapestry canvas  and painted green, which i was unable to remove so after much thought I decided to just cover it with air drying clay .Thankfully it worked well.

After everything was nice and dry i set to work distressing the paintwork on the shop front so that it had the lived feel. Anyone who knows me will know that i don't  do neat and tidy with my miniatures . I always like the well worn and lived in look. I think it looks more natural, more realistic and gives it more charm.But then that's just me, everyone has their own tastes.

Here it is now..

 I just have to decide on a name for it, and finish adding skirting boards to the inside when i decide on the layout, Then i can start to fill it with all the little things i am going to make.


Friday, March 30, 2012

The progress picture of Halfpenny house


This is what i have done so far to my Halfpenny house. as you can see i think i got the negleted look that i wanted for it. Just the roof and chimney to do now. But i think that will be another days work as i am going to get my clay out today and try to make some foods.

Thursday, March 29, 2012

update on Halfpenny house

Well everything dried ok, just a few little cracks to deal with so nothing too bad. All sorted now and
I have painted the outside with a cream coloured paint and distressed it so that it looks really old and neglected.
The trouble with the Petite properties is once you start building them you just cant stop. The only things I have left to do are the roof tiles and the chimney.
I will upload a picture tomorrow for you to see the progress.

Wednesday, March 28, 2012

Petite properties

Halfpenny House

I have been away from my blog for a while as i have been feeling a bit poorly. I think i must have caught one of those dreaded viruses that have been doing the rounds.However i couldnt't  sit still doing nothing when i felt a bit better so i  made a start on one of my Petite property kits, Halfpenny house. The house kit was a free gift when i subscribed to the dolls house and miniature scene magazine.

Here is the kit out of the bag with my instruction book from the Petite properties corner shop which i am going to use to help me build it.


I have used air dry clay to make tiles on the living room floor and card which has been painted and distressed with acrylic paint to make the floorboards upstairs.


I have added air dry clay to the outside of the building today. I didn't want to have a brick effect finish like the shop as i want to paint the outside to look like rough plaster. So after applying the clay i distressed it with an old hairbrush and a washing up scouring pad. Hopefully it will have the effect that i want but we will have to wait and see.


I hope it will dry ok without too many cracks or shrinking.

I will give you an update tomorrow.


Tuesday, March 13, 2012

Ratty

Over the weekend i sculpted Ratty added his fur and yesterday i finished dressing him. I havent made him shoes yet as i dont have the leather in the colour i need .So that is a job for another day

Here are all the little characters.


I hope you like them. I really enjoyed making them all and seeing all their little facial expressions coming through.
 Helen xx.

Thursday, February 23, 2012

Moley's Cottage


Here is Moley outside his cottage , with a pair of ducks which i made from a tutorial by Anya Stone.
The cottage is made very simply from balsa wood, mount board and diy filler, which once dried was painted with a dirty wash of acrylic paint. The roof tiles are cut from wood veneer.

Here you can see all the flowers i have made and planted around the cottage, The rose that is growing over the cottage window is one that i bought and i am not very happy with it. Maybe i will change it for something else.

___________________________________


Yesterday i finally finished dressing Badger . I am so glad that he is now finished as he had been waiting for clothes for ages.  Hopefully now i can get on with making Ratty.


Wind in the Willows scene

With the Caravan now completed and all the designs painted on it i decided to make a room box which would fit the caravan and the scene around it.

I painted the distant scenery and sky onto the inside of the box and added walls and banks and a road.


I love using scatter materials and doing the scenery . It is so relaxing and i love to see it taking shape and wondering how it is going to look.


Tuesday, February 14, 2012


The second character from the wind in the Willows that i have completed is Toad. I must say that i have sculpted and furred old Badger too but he doesn't have any clothes yet so i thought i would spare him any embarrassment and not show a picture of him until he is dressed Lol!

I decided that my Willows animals would have a gypsy caravan so I bought the Macqueenie miniatures kit for a 12th scale caravan and set to work.
I must say that the kit is simply amazing and comes with all the furniture you need in kit form and even a metal cooker. It is brilliant.
Here it is after i had constructed it and started the painting.